nsai enthusiast Samuel Brierley, the owner of this 40cm/16″ tall Siberian Elm/Ulmus pumila, asked me recently if I would suggest a design for the tree and sent me a number of images from which I could design him a bonsai. Sam lives in New Zealand and the tree had just entered dormancy, dropping its leaves and revealing its branch structure; a perfect time for styling deciduous bonsai.
.JPG)
While the tree had an impressive trunk taper and size and was in good health, it also had many aesthetic defects that would need to be addressed before its full potential as a bonsai could be realized.
After studying images of the Elm, I found my favourite front for the tree (above). As the basis for all good bonsai design, the trunk and trunkline must first be established as, unlike the branch structure and exact placement of the branches themselves, the appearance of the trunk is the most difficult part of a bonsai to change.
However, from my proposed view, it was easy to see that the large crossing root was ugly, there were a number of large perfectly circular wounds that were obviously man-made and the top half of the trunk lacked taper, coming to an abrupt halt where the tree had been chopped in the past.
.JPG)
The large crossing root at the front of the tree, not only is this root out of scale and growing sideways, it is also very straight and untapered. In this particular case, the best solution would be to remove the root entirely.
.jpg)
(Virtual image) With the root growing sideways along the trunkbase, the resulting wound would be surprisingly small and when hollowed out into an uro (literally a deadwood hollow) it would become much more attractive.
As Elm (along with most deciduous trees) do not have strict life-lines there was no risk of losing any top-growth as a result of removing the root.
b.jpg)
(Virtual Image) The next problem to resolve on the trunk were the large wounds where branches had been removed in the past. Two large wounds could be seen on the front of the tree and their perfectly rounded appearance belied their manmade origin.
Wounds such as these can sometimes be made to look more natural and aesthetically pleasing by simply altering their shape and hollowing them out into Uro. However, I felt that combined with the new hollow at the base, the three proposed uro would look slightly strange and isolated. And so the idea of linking the wounds into a long shari began to take shape. The shari could then be hollowed out deeply, adding a great deal of interest to the trunk and the bonsai as a whole.
Designing a deciduous bonsai deadwood feature (such as a large shari) can be difficult. The temptation can often be to randomly carve out a section of the trunk, the result being that the shari does not seem to ‘work’ with the rest of the tree.
It is much better that an element of design is introduced into the all-important outline of the deadwood feature and this is best accomplished by imitating existing lines on the bonsai itself.
As indicated in the diagram above, the area between the two wounds was bordered by the strongly curved edges of the trunk. By replicating these curved edges, the shari could be designed so that it reinforced the natural lines and movement of the trunk.
.jpg)
(Virtual Image) And so I drew a shari/large hollow connecting the two large wounds that followed the flow and movement of the trunk. By connecting the wounds, their roundness was removed and they began to look more natural.
However, the shari could still be further improved.
.jpg)
(Virtual Image) To further remove all traces of the wounds, I then virtually extended the shari out at each end.
.jpg)
Rather than have an area of the trunk where the wood has simply been uniformly dug out and hollowed to a uniform depth, I began to draw in edges to the hollow. Now, with this design the bark would be removed to define the edges of the deadwood feature, but then a second complimentary ‘shape’ with different lines could be added to where the wood was actually hollowed out.
.jpg)
(Virtual Image) Another improvement to the design of the deadwood was then made to the lower edge of the wood to increase interest. Note that my intention was that the shari would be hollowed very deeply and knowing that there were wounds at the back of the trunk that would also need carving, I felt that it was a great opportunity to introduce some ‘see-through’s’ all the way through the trunk.
.jpg)
(Virtual Image) Finally, it seemed natural to extend the shari downwards so it would then encompass the hollow at the base of the tree where the large root had been removed previously.
I e-mailed my design to the owner of the tree and happy with my design, Samuel set to work using a die-grinder and a Dremel to carve out the wood.
.JPG)
After marking the edges of the shari on the trunk with a marker pen and using a sharp knife to cut along these lines, the bark was peeled away to reveal the bare-wood underneath. Having then marked the edges of the area to be hollowed, the wood was carved out as deeply as possible………..with great results!
.jpg)
This area at the back of the tree had a very thick branch whose base created inverse taper to the trunk when the tree was viewed from the side and the back. As there was already a large scar in this area, I suggested to Samuel that he while he created the shari at the front of the tree, he also removed a large section of wood along the white line indicated in the image above.
.JPG)
After the inverse taper at the back of the tree had been removed, the scar was hollowed out.
.jpg)
(Virtual Image) With the trunk of the tree now established and armed with a new set of images of the newly carved tree, I began to draw the virtual design of the new branch structure. In the image above I have chosen which branches on the lower trunk to keep and which branches to remove.
.jpg)
(Virtual Image) I suggested to Samuel that as the top of the trunk was very obtuse and lacked taper, it would be preferable to accentuate the existing split to indicate to the viewer that the top of the trunk had divided into two parts (and was therefore naturally tapered). I then virtually designed the upper parts of the branch structure, constructing a natural apex comprising of all the upper branches rather than a more simplistic pine-tree-style apex.
I also suggested to Samuel that he could consider extending the shari all the way to the top of the trunk…………
.JPG)
……….which he did to great effect………
.jpg)
……….before pruning, wiring and placing the branches.
The tree suddenly started to look like a bonsai and with the various faults on the trunk addressed and the basic branch structure in place, the tree could be allowed to rest for the rest of the Autumn and Winter before being planted into a bonsai pot next Spring.
.jpg)
(Virtual Image) My final drawing of the bonsai as I proposed it should be developed over the next few years, increasing the taper and ramification of the branches. Notice that the crown or apex is built from all of the branches in the upper trunk.
The three larger branches on the right hand side have been given smaller crowns of their own to reflect their size in comparison to the other branches. The general placement of the other branches has been made to reflect the movement of the tree towards the right, in accordance with the flow of the trunkline.
As a bonsai I have high hopes for this tree, a wonderful example of an ancient Elm!
Update: June 2013

I had the pleasure of receiving an updated image of the bonsai from its owner Samuel Brierley in June 2013, a year after its initial styling.
The Elm has nowbeen potted up into a purpose-made bonsai pot from Vic Harris of ErinBonsai.com to create a quite stunning image!
Update November 2013: Samuel Brierley has been kind enough to send me this image of the Elm bonsai coming back into leaf. A stunning image indeed!
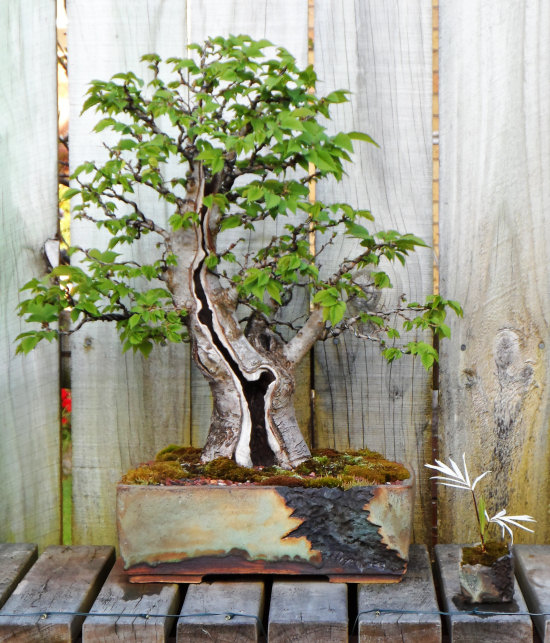

Siberian Elm bonsai/Ulmus pumila40cm/16″ tall. June 2012 to November 2013.