.jpg)
I originally worked on this Himalayan Cedar or Cedrus deodara belonging to Faisal Waheedy in the Spring of 2010. The raft planting was purchased from the guy who had collected it in Wales and had planted it on its side. The raft consisted of 7 branches wired upwards so they would form 7 trunks in their own right. If the image above is studied carefully, one side of the rootball as well as the original trunk can still be seen on the soil surface.
The tree (or trees) was not in the greatest of health when I started work on it. The raft hadn’t been repotted for many years and as a result was very rootbound, the soil itself was very poor and compacted, leading to difficulties watering it. The poor foliage colour also indicated chlorosis.
.jpg)
Spring 2010: Faisal and I started repotting the raft. Great care has to be taken when repotting Cedrus species as they dislike root disturbance and can drop their needles as a result.
One objective I did have while repotting the raft was to turn it clockwise in its pot. The trunk of the original tree (now lying on its side in the soil) was long and straight and as a result, the positions of the upright trunks was awkward (see first image).
The image above shows the raft from what I believed would be a better front-view; by turning the tree clockwise the trunks would be bought closer together visually. (Also known as foreshortening)
.jpg)
After a couple of hours work, the raft was repositioned. Due to the front-to-back distance of the pot being relatively narrow, a lot of manipulation of the rootsystem (and brute force) was needed to position the raft as I required it.
With repotting completed, the raft was then left alone (without styling) while it recovered from repotting.
.jpg)
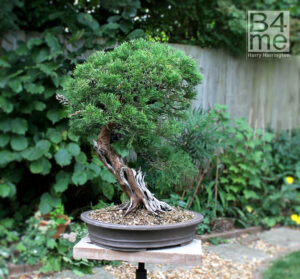
September 2011. 18 months later Faisal asked me to restyle the raft for him. As can be seen in the image above, the bonsai was in far better health. The repotting of Spring 2010 and a regular dose of ericaceous fertiliser had encouraged very strong and healthy growth in the tree and the raft had required hard pruning three times through the course of the growing season just to keep it in shape.
.jpg)
.jpg)
Before I could apply wire to the branches I had to remove all the old needles one by one, leaving just those on the youngest shoots.
.jpg)
.jpg)
As can be seen in the images above; plucking the older needles also thinned the foliage mass considerably allowing me to study the branch structure of each trunk as well as making wiring easier.
.jpg)
Plucking the needles from each of the trunks took over 4 hours but left a much clearer view for me to style the trees. Notice that I also removed two trunks including a thick one at the back of the group, leaving 5 trunks in total.
.jpg)
As light faded that evening, I had to stop work with the four minor trunks fully wired but the main trunk still to do.
.jpg)
The following day I started styling again, beginning the session by wiring the primary branches of the main trunk.
%20700.jpg)
After another 3 hours wiring (making a total of 12 hours from start to finish) the raft styling was complete. All that remains now is to find a suitable pot for the Cedar bonsai next Spring.
Cedar bonsai/Cedrus deodara raft bonsai. Height of main tree approx 24″/59cm